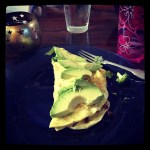
Breakfast! (Taken with Instagram)
I know I suck at presentation, but breakfast is a 2 egg omelette with sun dried tomatoes, broccoli and mushrooms topped with avocado… Totally forgot the kale though
Breakfast! (Taken with Instagram)
I know I suck at presentation, but breakfast is a 2 egg omelette with sun dried tomatoes, broccoli and mushrooms topped with avocado… Totally forgot the kale though


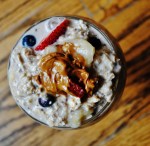
My amazingly spectacular gorgeous drool worthy breakfast:
Ingredients
1/2 cup of raw oatmeal, 1 cup of coconut almond milk, 1 tsp of vanilla extract, 1 packet of Truvia (or any natural sweetener) , 2 tsp of fresh grated ginger, 2 tsp of chia seeds, dash of cinnamon, 1 banana, 1/2 cup strawberries and blueberries, nut butter
- Mix together first 8 ingredients (up to banana) in a bowl and mix very well (make sure no cinnamon clumps are left! best suggestion is to mix cinnamon in with oatmeal and all the dry ingredients than pour milk on top)
- Let sit in refrigerator overnight covered with plastic wrap!
- In the morning layer overnight oats in a parfait put down a layer of oats, than slice strawberries and blueberries and a dollop of any nut butter (i highly suggest sun butter or almond butter!) than repeat until oats and berries are gone, of course put a dollop of nut butter on top! 🙂
- enjoy! (possibly make seconds?)
GET IN ME
omfg
I have always wanted to make this!
I had a speaking engagement at a local raw food potluck tonight, and it went so well! This organization is basically a group of people who get together and spread the word about Raw food/veganism, and I was asked to be the speaker at their monthly potluck.
I took along one of my closest friends, Jess, who I have referenced before. She was my roomie, and is also a trainer at my gym, so we went to share our knowledge with these raw foodies about not only eating well, but exercising, and how we train at State of Fitness.
It went so well! There were 40+ people there, and they were great! Such great energy, great questions, very engaging people. They made speaking about what we are passionate about very easy.
After our presentation was over, we had a number of people come up and personally thank us, but also ask us more in depth questions. One woman came up to me and just started sputtering off the issues she has been having, in search of help, and was so genuinely thankful that we had come that night and might be able to help her with her ailments. It is amazing what the human body can accomplish when it is being fueled and worked properly 🙂
Just all in all a very rewarding experience. I had one gentleman in the audience who told me that I was “exceptional”. It was such a sweet compliment, and all around just a great experience.
Good food too 🙂

This recipe really tested my skill level in the kitchen. Broiling, carving, bagging, this one was certainly an adventure.
The shopping was all pretty straight forward, until I got to the “Poblano chiles”, because, according to Meijer, they are “Poblano Peppers”. Enter, exhibit A:

Alas, I believed it to be the same, so off to the check-out we went, and from here on out they will be referred to as “peppers”. This actually wasn’t the first “interpretation” I made on this recipe, for example:
“Place tomatoes and tops, if desired, on a jelly-roll pan”
What the H is a jelly-roll pan? Google tells me it is just a baking sheet, so all systems were a go.
The broiling turned out to be way easier than I thought it would be, since it was just a button on the oven next to “bake”. I used to be under the impression that broiling was a fancy way to boil something in a frying pan. Oh, how adult-hood is changing me.

Post-broiled peppers, blackened skin acquired.
I was a little unsure about putting the broiled peppers into a paper bag, but then realized it was probably to dry them out, making the skinning process easier.

A Horrocks bag sealed with drink mixers is kind of the same thing the recipe asks for. Paul tried to take a picture of me putting the peppers into the bag, but said my face looked too disturbed.
Skinning the blackened peppers, by the way, not annoying at all! Just kidding, it was a total pain in my butt.
The tomato carving was the most nerve-wracking part for me. I was deeply afraid of failure in this step, but, I am happy to report that I was very successful! I envisioned a massacre, but it was very much like carving a pumpkin. Just don’t stab through the bottom (or a side) and you are all good.

So cute!
I actually did the tomato carving first, that left the pulp to pretty much drain itself while I was preparing the peppers, onion, and corn. By the time I was ready to go back to it, I had very little pressing to do.
Confession time: I didn’t rinse my quinoa. I never do. I am a second child, I ate stuff off of the floor, got pacifiers straight out of the dirt, and shared my ice cream cones with the dog. I doubt my life will be saved now by rinsing quinoa. It always turns out just fine!
I questioned whether the last step was necessary or not. What major difference could 1 and a half minutes in the broiler make? Paul, in all his wisdom, told me that baking will cook it all of the way through, and the extra broiling will crisp the top. Thank goodness for adult supervision while I’m cooking.

Ready to go into the oven!
What a flavor-full turn out! Even if you don’t like tomatoes, eating just the filling will satisfy you without an overwhelming tomato taste. And it looks so impressive and presentable!

The only thing I might change is the quinoa to corn/onion/chili ratio. The mixture turns out to be mostly quinoa, but I believe it could be have a stronger flavor with more of the corn mixture.
All in all though, this seems like a very tedious recipe at first, but is one that can be mastered after just a few swings at it.
You can find the full recipe here: http://www.myrecipes.com/recipe/baked-tomatoes-50400000121356/
The recipe I will be tackling next, a little more in my comfort zone skill wise, is a beet salad. It will be my first go around with beets, so we will see how it goes!
I hope everyone had a safe and happy 4th of July! i will post about my vacation sometime this week, I promise!
Holy buckets of food love, people. I have fallen deeply in love with this recipe, AND, both the first and second time I have made it was for company, not just my good-hearted boyfriend. How about that? I’m getting daring in this third month.
This recipe has had rave reviews from everyone I have made it for and who has tried it thus far, so I hope you guys enjoy it too! On an equally as happy note, this recipe has a very low difficulty level (heaven forbid we complicate things).
I was secretly blessed while doing my shopping for this dish because it calls for “4 mushroom caps”, yet Meijer only sells them in packs of 5 that I could find. Turns out that both times I have made it, I have had enough “stuffing” for 5 or even 6 mushroom caps, just a warning. Also keep in mind that I am terrible at measuring, so this could be just a user error. The rest of the shopping list is very straight forward, but I would recommend getting the pitted kalamata olives. It really makes “finely chopping” them much easier.
There is no step for clearing any stems you may have on your mushroom caps, but I had to do a little trimming to make for a flat surface. Once the oven was ready to go, I sprinkled salt and pepper over the caps and slid them in there. You can actually go easy on the salt. I have found that there is more than enough flavor between the mushroom, olives, and cheeses, but it depends on your taste. Same goes for the pepper.
My mushrooms were good to go after 20 minutes, but this probably depends on your oven (other tricks I am learning… GET TO KNOW YOUR OVEN AND ITS TEMPERAMENT. *Not temperature.)
20 minutes is just enough time to chop your spinach, shred your Parmesan, chop your olives, and mash it all together. As far as the marinara sauce, I used the jar kind, but feel free to use which ever kind you would like.
As stated before, I have found that I have plenty of “stuffing” for more than 4 caps, probably up to 6 depending on how you stack it, but after putting the marinara onto the caps I just spoon the mixture on top, sass it up with some more Parmesan, and pop it back in the oven for another 10 minutes.
What comes out is tender, cheesy, hearty, yet healthy goodness. They are SO good!
Find the entire recipe at http://www.eatingwell.com/recipes/cheese_spinach_stuffed_portobellos.html.

from mystateoffitness.wordpress.com

So many people lose sight of this! It of course is good to have a goal, but it is even better to support those goals with habits that will stick with you for life!
